| Summary: Get your favorite free MP3 downloads from music subscription services, online radio, YouTube, Google or any other source of free music audio. This simple software automatically records audio on your computer, then makes it into free MP3 downloads and automatically tags the MP3’s with the correct song title, artist, album. Any audio you can play on your computer can be converted to free MP3 download files (with no DRM) that you can play on any iPod, iPhone or any MP3 player. This program makes your free mp3 downloads legal. |
.
Important! Do not use this “free MP3” method to take music you’ve not paid for. Artists deserve your financial support! Use this program to make free DRM-FREE MP3 downloads be used to replace CD’s you’ve lost or damaged or to replace music you’ve previously purchased as a CD, Cassette, 8-Track, or Vinyl Album.
.
ReplayMusic is an amazing computer program that automatically converts any stream of music you play through your computer into individual non-DRM MP3 music files that you can burn directly to Compact Disc CD’s. You can also use this program to create free MP3 music downloads that are not copy protected and can be copied or transferred to any iPod, iPhone, or any MP3 player.
Below are examples of audio music sources you can easily convert to free MP3 music downloads . I’m in the process of writing individual blog entries for each of them:
- Convert Pandora.com music and songs into free MP3 file downloads.
- Convert Slacker.com music and songs into free MP3 file downloads.
- Convert Napster.com music and songs into free MP3 file downloads.
- Convert your old vinyl LP albums to free MP3 file downloads.
- Convert your old 8-tracks or cassettes to free MP3 file downloads.
- Convert YouTube videos to free MP3 file downloads.
I’ve been using ReplayMusic since 2006. ReplayMusic is very easy to use and I’ll show you how in the steps below….
When ReplayMusic software records (from any music source), it uses the silence between songs to perfectly separate each song into an individual (non-copy-protected) MP3 track. As ReplayMusic splits off each MP3 track, it uses a comprehensive Internet song database to identify the song to automatically tag the MP3 file with the artist’s name, song title, album, track number and genre. Simply run the software, start your music source, and let the program do the rest.
Instructions
Operating Systems: Windows Nt/2k/XP/Vista
Difficulty: Easy
Time: Less than 15 minutes to install and configure
Things you’ll Need
- ReplyMusic.com software
- An Internet Connection or other music source
.
How to use ReplayMusic for free MP3 DownloadsOne time Setup, Steps A, B, & C: The ideal program settings are described in Steps A, B & C below. Once you’ve configured the ideal settings, the ReplayMusic program will save the settings so that you won’t need to change them again. |
|
| Step 1 | Step 1: How to Use ReplayMusic to make free MP3 Downloads
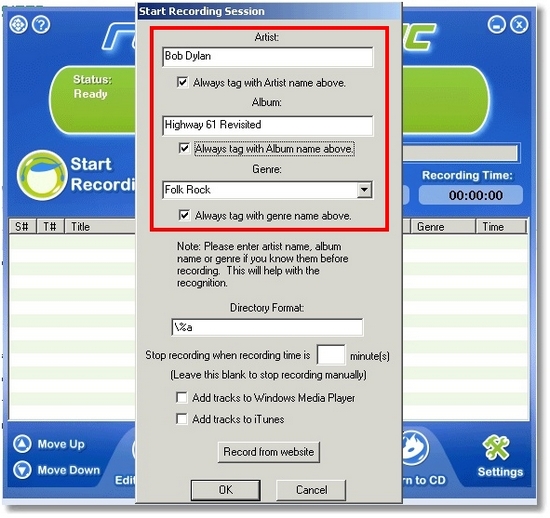
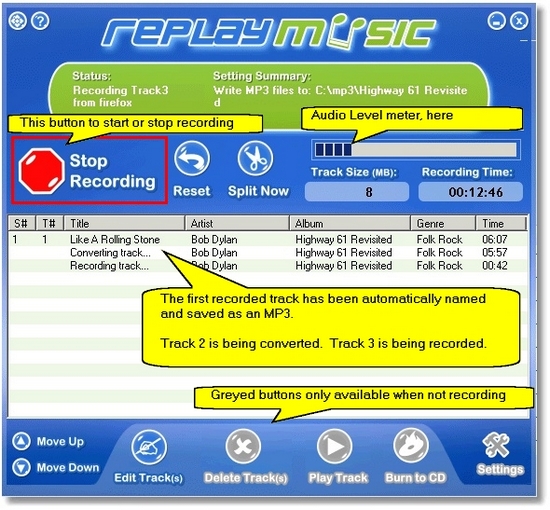
For best results, you should start ReplayMusic before you start your browser or begin playing the music stream through your computer. Start Recording / Stop Recording Button: Click ReplayMusic‘s “Start Recording” button, then begin playing the music or audio that you want ReplayMusic to capture, split, and tag. Start Recording Session Dialog: Whenever you click the “Start Recording” button, a dialog box will appear that will allow you to specify default Artist, Album and Genre tagss for the MP3 files that will be created. Below are some general tips: Default Artist, Album, Genre: ReplayMusic can mostly identity the Artist, Album and Genre of each song it records. Mostly, but always. If you are recording a streaming Internet Radio, you should the a default album name that ReplayMusic can use if it is unsuccessful at identifying a song. If you are recording an album by a particular artist, you can more accurately tag the tracks if you specify the Artist, Album, and Genre then enable the checkboxes that force ReplayMusic to always use the tags you’ve specified. Remember, an artist may include some songs on more than one album. For example, a song may appear on the original release then may appear on several “Greatest Hits” albums. You can use the “Start Recording Session” dialog to force ReplayMusic to use the Album tag that you specify.
|
| Step 2 |
Step 2: How to Use ReplayMusic to make free MP3 Downloads The buttons at the bottom of the screen that you can use to edit a track name, or delete a track, or to burn a CD can only be used when ReplayMusic is not in “record mode.” The “Reset Now” button clears the list from the screen, but it leaves the captured MP3 files in the target directory on your computer hard drive.Audio Level Meter: When the music is loudest, the meter’s level shouldn’t go much past the center of the audio meter. If the level setting is too high, your MP3 file may have distortion or “clipping” on the loudest portions of the audio. .
|
| Settings Step A |
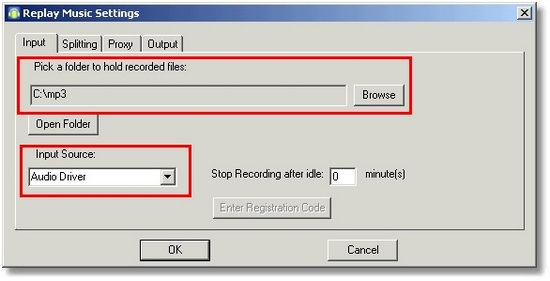
Setup Step A: Settings > Input [tab]
Folder: Pick a folder on your local hard drive to hold the recorded files. You can save the MP3 files to any drive, local or networked, but I’ve discovered that the files may have skips or will not record correctly if the external drive or network drive is slow, or if the speed or connection to the external drive is poor. So, for best results create a folder called C:\MP3 on your local drive and then, after the MP3 files have been successfully recorded, move them to any device (or external drive) . Input Source: In most cases, the input source choice is “audio driver” or “sound card.” This allows ReplayMusic to record and split any audio that is played through your sound card. Important: Because you’re recording through your sound card, you must switch off or disable any the programs that may send sound through your computer’s sound card. This means you should close all other windows, and close any unnecessary browser (Intenet Explorer, Firefox) Windows. You may also want to temporarily disable Windows Operating system sounds, such as the “dings” you hear when there’s a Windows error. To disable Windows Operating System sounds, select: Start > Control Panel > Sounds and Audio Devices > Sounds [tab] > Sounds Scheme: No Sounds. |
| Settings Step B |
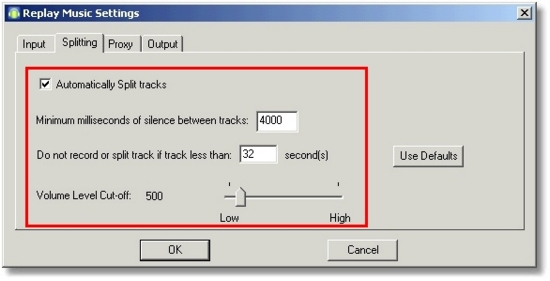
Setup Step B: Settings > Splitting [tab]
Automatically Split Tracks: Enable this checkbox to have ReplayMusic automatically create a separate MP3 file whenever it detects silence in the audio you’re playing through your computer. Silence Between Tracks: I recommend that you use a setting of “4000.” The default setting of 300 will cause ReplayMusic to mistakenly split songs that may have very short silence in them. Changing the setting to “4000” will allow ReplayMusic to record each song more accurately, even if the song has short moments of silence in it. Do not record or split track if less than x seconds: If you’re recording an album with very short songs, then you must set this variable to a number that is less than the duraction of the shortest song. For example, if the album you’re recording has a 20-second song, then you must set this to 19 seconds or less for Replay to keep all recordings of 20-seconds or more. I generally use a setting of 32 seconds so that ReplayMusic will automatically discard Pandora.com’s 30-second commercials and 30-second sample songs from Napster.com Volume level cutoff: You will have the greatest accuracy splitting songs when the Volume Level Cut-off is set at 500. .
|
| Settings Step C |
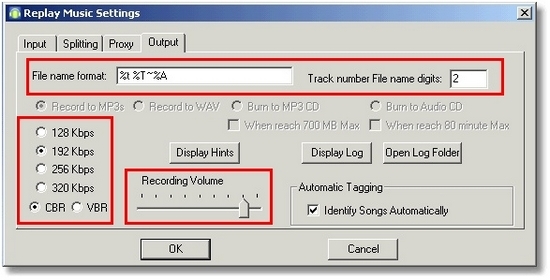
Setup Step C: Settings > Output [tab]
File name format: This setting allows you to customize how your files are named. The symbols used for track name formatting are as follows:
The default setting is “%T-%A” which names the MP3 file with song title, a dash “-“, then the artist. Below is a sample title created by the default setting: Default file name, no track number: “Like a Rolling Stone-Bob Dylan.mp3” I recommend using a slightly different file name format. Some (older) MP3 players automatically sort and play MP3 files *alphabetically* by song name. That’s bad because you typically want songs played in TRACK order, not Alphabetically by title. To ensure that songs will be played in track order, use the Fie Name format shown below which places the track number at the beginning of each file name. Also note that I use the tilde character (~) instead of the dash to separate the Artist’s name at the end of the file name: F%t %T~%A New Example file name with track number: “01 Like a Rolling Stone~Bob Dylan.mp3” Track number File name digits: You must set this option to “2” to add leading zeros to track number. If you don’t select 2, then the files will not play in the correct track order on some MP3 players. In the unlikely event that you’re recording an album with more than 99 songs, you’ll want to use 3 digits. Automatic Tagging: Enable this checkbox to allow ReplayMusic to automatically tag MP3 files with song title, artist, album, track and genre. Kbps: Select the bit rate of the Mp3 file. Generally 128 Kbps gives great quality, but you can go up to 320 Kbps. Note that if the Internet stream you’re recording is 128 Kbps, recording it at 320 Kbps will not result in better sound quality. I recommend using the 192 Kbps setting. In some of my other specific blog entries, I describe the maximum bit rates for different audio sources. CBR or VBR: CBR stands for Constant bitrate and VBR stands for Variable Bitrate. I recommend using CBR because CBR is compatible with virtually every MP3 player ever made. VBR is a newer encoding method so the recorded files will usually be smaller compared to CBR, but some MP3 players do not recognize MP3 files that have been recorded with VBR. Recording Volume: The volume level may vary depending on your computer or sound card. On my computer, I’ve set the Volume level at the 8th marker. Your goal is to set the Recording Volume so that as you’re recording the audio stream, the loudest parts of the music to only make the ReplayMusic‘s audio level move to slightly beyond the midpoint of the meter (see Step 1).
|
| Optional Step: Adjust MP3 volume |
Optional Step: Adjust the album volume with the (free) Mp3Gain program.
Are you tired of having adjust your iPod or MP3 player the volume every time a new song comes on, or whenever a new album starts playing? the free program, MP3Gain can adjust your songs and albums so that all songes are approximately 89 decibels even if the original source of the music was louder or quieter than 89 decibels. After you use Mp3Gain, you’ll no longer need to adjust your volume to compensate for the different volume levels of your MP3 songs and albums. To learn more about the free Mp3Gain program, click this link. |
.
Photo Credit
Image Captures & Photos by Chuck Eglinton



Hey Chuck,
I have a somewhat complex, yet effective way to digitize vinyl, tape, wire recordings, etc. if you’re interested.
ALSO……is there a program that will take, say, an entire CD with of digitized material and equalize the volume levels, BEFORE burning the disc? OR, run an entire playlist? I am always jockeying the volume when my songs have come from many different sources/
Will MP3 Gain work for the above?
Hi Jim,
Yes.
You can use MP3Gain to automatically equalize the gain for INDIVIDUAL tracks
Or you can use MP3Gain to equalize entire albums – still leaving individual track gain intact.
Hi Jim,
Yes I’m interested in your method.
Keep in mind that you can use Line-In to your computer for your vinyl, tape, wire recordings, then use Replay Music to split (and name/tag) your tracks directly from your vinyl, tape, wire line-in.
mp3Gain will automatically adjust the volume for you after you’ve recorded the MP3. Just specify a folder to MP3Gain, tell it the volume level, and it will adjust all the tracks for you.
I went to the site to download Replay and it is not free. It says there is a demo version or you have to buy it. (I thought it seemed too good to be true!) LOL!