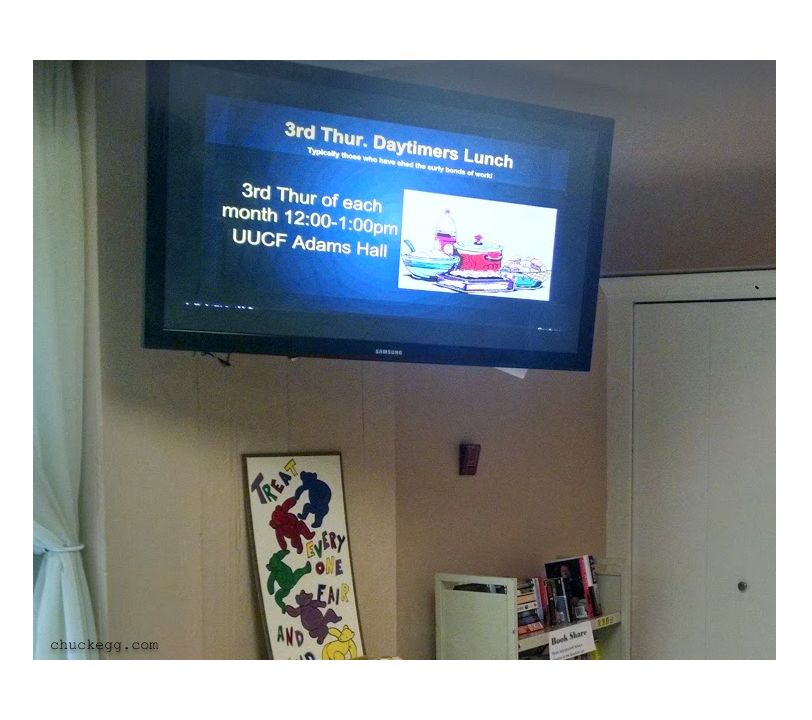
- No human interaction needed: Simply switch on your display and your presentation appears automatically on as many screens as you choose to install.
- Multiple people can work on your slideshow (remotely) using any browser (mobile or desktop). All changes to your slideshow are automatically shown on all your digital displays within minutes.
- Cheap and robust: The hardware cost is less than $40 per display with a one-time $35 software site license fee.
TOO MANY STEPS? I CAN HELP WITH TURN-KEY SOLUTIONS…
- I’ll sell you a case-enclosed Rasperry Pi 3, all necessary cables, and a preloaded, licensed copy of the Binary Solutions digital signage software for only $99 plus shipping. Simply connect it to your display and power it on.
- Also, (optionally) we’ll host your <html> slides script for $9 per month (with tech support).
- Or, (optionally) we’ll host your script AND provide email tech support for $99 per year.
- Click this link to contact me for plug-and-play signage solutions…
or do it yourself by following the steps below…
This robust but inexpensive signage solution requires the following components:
- Raspberry Pi Model 3 (or model 2) computer (~$28 to $35) with a 5v power source
- Micro SD card 4GB minimum (~$6)
- Raspberry Pi case (optional) (~$2)
- WiFi or wired Internet connection.
- Google Slides online account, which is similar to Microsoft Powerpoint.
- A website to host a few lines of HTML code.
- Raspberry Digital Signage Software from BinaryEmotions.com ($35 site license).
- Any monitor or flat-screen with an HDMI input.
Step 1a: Edit your Digital Signage with Google Slides (Free!)
To Get Started with Google Slides, click here. For more detailed instructions, including switching from MS Powerpoint, click here.
- Because the slide presentations are in the cloud and associated with a Google account, users and owners of Google Slides can edit them at any computer, phone, or tablet without having to carry around a flash drive.
- Multiple people can work on slides and presentations at the same time, you can see changes of others as they make them, and every change is automatically saved.
- Google Slides include a revision history, which allows editors to access any version of the presentation in the past and also keeps a log of who made which edits.
- Simply find an image on any internet web page and use your mouse to drag it from the page of images to the current slide you’re editing. Â This drag-and-drop image import makes Google Slides much easier than Powerpoint which requires multiple steps to add an image.
- Tip: The best looking slide images are those having a transparent background. Â To find images with transparent backgrounds, search for images at http://images.google.com then to display only images having transparent backgrounds, select Tools > Color > Transparent. Â For animated images, click the “Type” drop down then select “Animated”. TIP: Create a “Repository” to store seasonal and unused slides
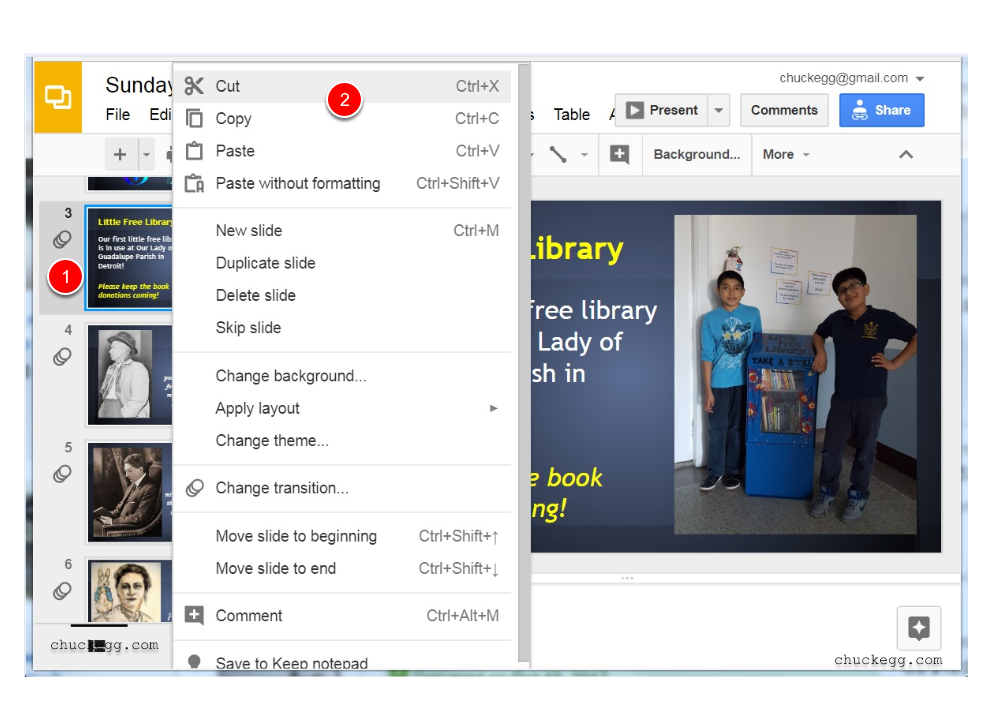
Create a separate Google Slides presentation where you can keep seasonal and other slides that you may move in and out of regular display rotation. Standard commands that you already know from Microsoft programs (ctrl+x and ctrl+v) can be used to individually “cut” slides from your live Google Slides presentation and paste them your “repository” Google Slides presentation file. If you don’t want to use the keyboard shortcuts for cut and paste, you can (1) right-click on any slide thumbnail to display a (2) context menu with these cut and paste options (see the image below).
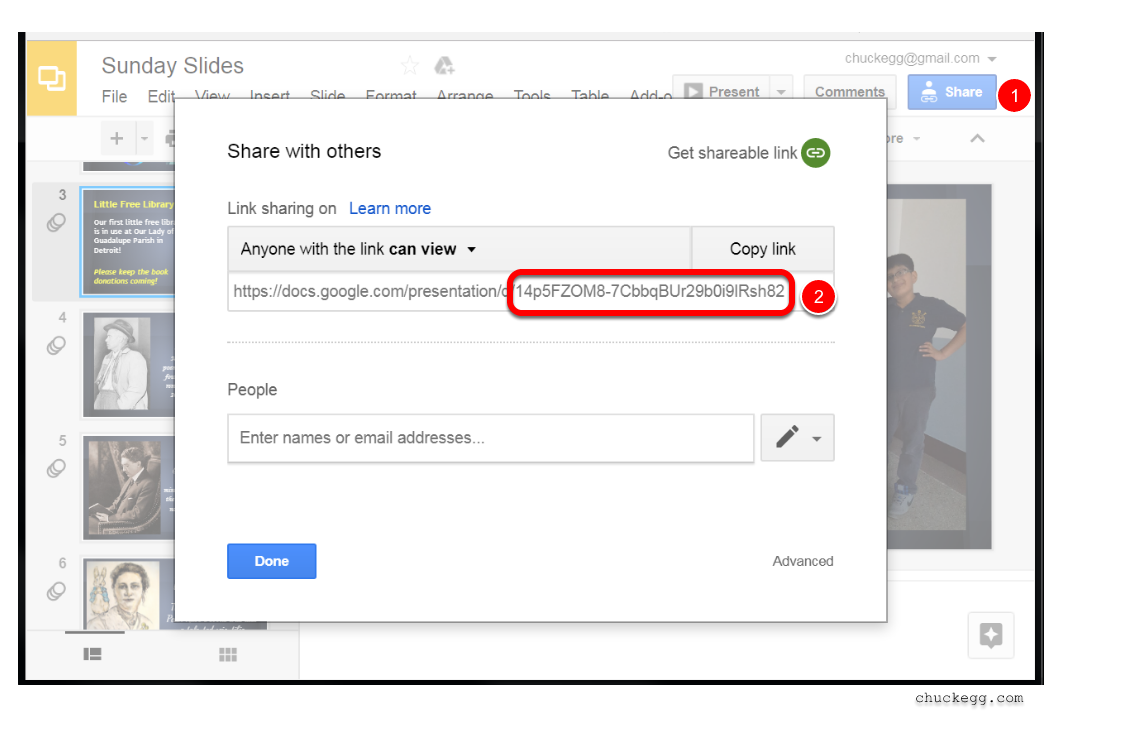
Step 1b: Finding your Google Slides Presentation ID
- Click the blue [Share] button in the upper right corner of the screen
- The Presentation ID is the set of random-looking characters after the rightmost slash (/) it the topmost text box. Â You’ll need this Presentation ID in the next step.
Step 2: Configuring your HTML code with your Presentation ID
If you need a free web hosting site, some are listed here. We will host your site and provide support for $40 per year. Click this link to contact me.
Below is sample HTML to upload to your hosted website. Â Note that near the bottom you’ll, need to make one change; replace {YOUR_PRESENTATION_ID_HERE} with your presentation ID from the previous step.
An advantage to using this method is that you could theoretically have various Google Slides presentation files and you could swap them out in an instant on all your displays by editing the presentation ID in the HTML file.
From any browser on your desktop or mobile device, you can visit the HTML link you’ve created  to confirm that the slideshow is loading and presenting slides at the correct speed.
<!-- content="xx" where...
xx = seconds between content refresh..
3600 = 1 hour refresh
900 = 15 minute refresh
note, the refresh command will be used if you're displaying the slideshow link on a webpage -->
<meta http-equiv="refresh" content="3600">
<!-- PARAMETERS for <iframe>, below -->
<!-- id= <-- the presentation id of your Google Slide file -->
<!-- &start=true <-- autostart the slideshow -->
<!-- &loop=true <-- automatically loop the slideshow -->
<!-- &delayms=15000 <-- slide delay in milliseconds 15000 = 15 seconds per slide -->
<iframe src="https://docs.google.com/presentation/embed?id={YOUR_PRESENTATION_ID_HERE}&start=true&loop=true&delayms=15000&" width="100%" height="100%" style="position:fixed; top:0px; left:0px; bottom:0px; right:0px; width:100%; height:110%; border:none; margin:0; padding:0; overflow:hidden; z-index:999999;">
</iframe>
Step 3: Raspberry Pi Computer Model 3 (wi-fi) or Model 2 (no wi-fi) (~$35)
- I recommend the Raspberry Pi Model 3 (wi-fi, faster processor) or Model 2 (no wi-fi, slower processor). Â The Model 3 has a faster processor and built in wi-fi. You can add wi-fi to the model 2 with an Edimax Wi-Fi adapter (range about 30 ft.) or the TP-Link TL-WN722NCÂ (range about 100 ft.). Both models have a standard Cat 5 ethernet port and are each about $30.
- Wired internet connections are the most reliable. Still, the wi-fi option exists if you’re placing the display where you dont have a wired internet connection.
- A phone charger as a power supply keeps your Pi “always on” so you don’t have to wait for the Pi to start up. You can also use a display’s USB port to power the PI, but then you’ll likely want to wait around each time you switch on the display to make sure the signage has loaded correctly. Also, leaving the Pi powered on reduces the chance of corrupting the software when the Raspberry Pi is powered off.
- The Raspberry Pi arrives without a case, but you can buy them on eBay for a few dollars. Be sure to select the correct case for the model you’ve chosen.
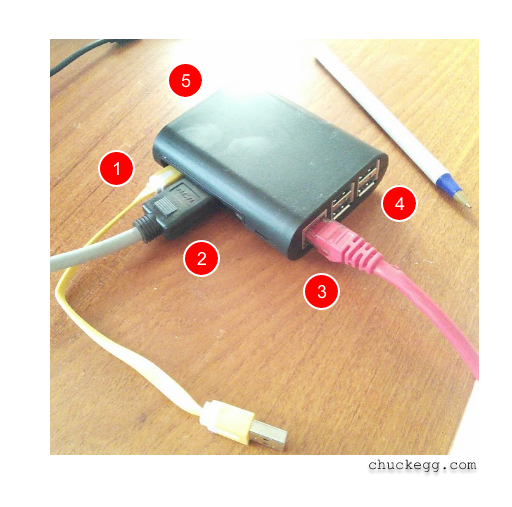
Numbered in the image below:
-
micro-USB 5v Power
- tor or TV(3) Standard RJ45 Internet jack Â
(4) USB ports for keyboard and mouse Â
(5) Micro-USB slot (not visible)
Step 4a: Raspberry Digital Signage Software Setup (site license $35)
The Rasperry Digital Signage software displays a full-screen browser view restricted to a specified URL; for example, the URL for the HTML <iframe> we wrote in an earlier step. You can use the software on multiple Raspberry Pis and displays at a site after paying $35 for a site license. Â You can learn more and buy the Digital Signage Software at BinaryEmotions.com.
- After paying for a site license, click the link sent to your email to download the digital signage software to your computer.
- Extract the ISO from the downloaded ZIP file.
- If you have used the SD card before; first format it.
- Write the ISO to the Raspberry SD card (4GB minimum) using Win32DiskImager (Windows) or dd (Linux, OS X) – SDHC class 10 recommended;
- Insert the micro-SD card into the Raspberry Pi and restart it.
- Find complete installation instructions at: http://www.binaryemotions.com/raspberry-digital-signage/download.html
When the Raspberry Pi starts, it looks like the image below and may take two minutes or more to fully load:
After the Rasperry Pi Operating system loads (the black screen in the image above) a browser like screen will appear (as shown in the image below).
When setting up the signage for the first time, you’ll have 15 seconds to click the link “Click here for settings modify” to display the setting modify screen. After you’ve configured the settings, they will be saved in the device and you can disconnect your mouse and keyboard because you’ll not need to access “settings modify” again.

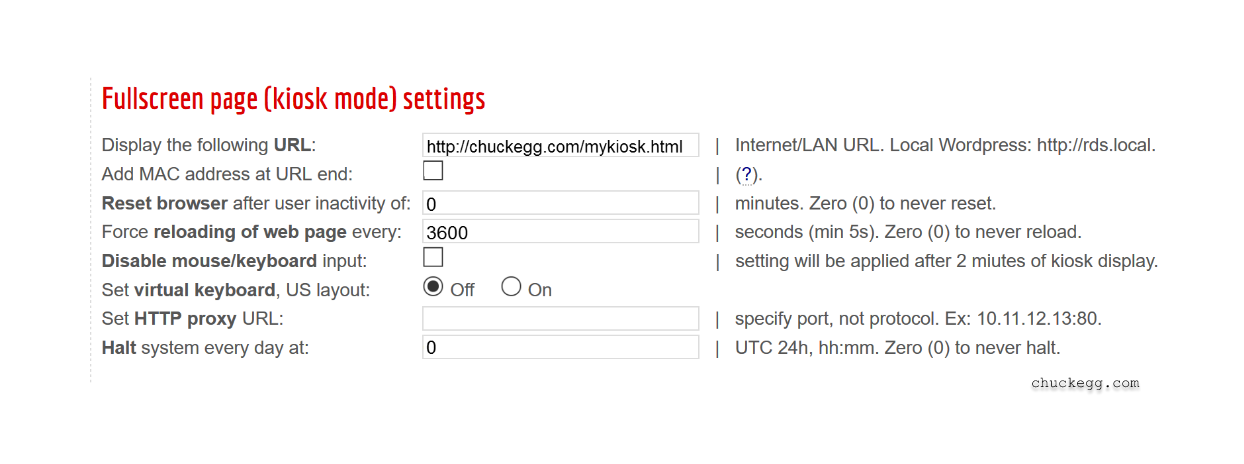
Step 4c: Raspberry Digital Signage Settings Modify > Kiosk Mode Settings
- Display the following URL: Â https://www.chuckegg.com/mykiosk.html <-this setting is important, you’ll replace this URL with the URL where you saved the html file that you created in step 2.
- Add MAC address at URL end: unchecked (doesn’t apply)
- Reset browser after user inactivity of: 0 Â (doesn’t apply)
- Force reloading of web page every: 3600 seconds <- This setting is important because it tells the Raspberry Pi how often to refresh it’s internal memory with the latest version of your slideshow from your Google Slides account on the internet. For example, 3600 seconds will refresh your slide show once each hour or 1800 seconds would refresh your slideshow every 30 minutes (1800 seconds / 60 seconds per minute = 30 minutes).
- Disable mouse/keyboard input: unchecked  (we only use a keyboard and mouse for initial configuration)
- Set virtual keyboard, US layout: Off (doesn’t apply)
- Set HTTP proxy URL: [blank] (doesn’t apply)


Great guide and it works fine!
Just one problem: As we state a time duration for auto-advance, any videos on the Slide are cut short. Is there any way around this so the video plays until the end?
The system image seems to keep going to sleep. A slight move of the mouse and the slideshow shows up again. How do I prevent it from going to sleep? And can I remove that annoying “Charging/power” lightening bolt from the corner?
Hi.
I didn’t write the software, I only sell bundled packages with the raspberry PI and the Google Slides integration
See the author’s contact information at the very bottom of the page at this link:
http://www.binaryemotions.com/raspberry-digital-signage-faq/
The lightning bolt means the PI isn’t getting enough power. The most recent Pi’s require a 2.5amp power supply. Most phone supplies are 2 amps or less.
–Chuck
Hi.
In the HTML script, note this line:
You can change “delayms=”, but of course each slide will be displayed for a longer time, not just the one with the video.
–Chuck
I am also having an issue with the program going to sleep after 10 minutes. Ive reached out to the author and am waiting for a response. I am using the free version currently and wondering if its related.
Is this compatible with Raspberry Pi Model 4?
yes